当サイトは個人的なメモみたいなサイトなので、SSL化とかしなくてもいいかなと思っていたのですが、
GoogleもSSLを推奨しているようですし、ブラウザのアドレスバーに「保護された通信」って出したいな。。と思い、SSL化することにしました。
ということで、無料SSLサーバ証明書「Let’s Encrypt」を利用してみようと思います。
python-certbot-apacheでApacheの設定ファイルもSSL化したものを自動でデプロイしてくれるのでSSL化はそれほど時間をかけること無く完了しました。
(この記事書いてる方が時間かかってる。)

前提条件
サーバ:Debian9(stretch)
Webサーバ:Apache2でmod_sslがインストールされていること
目次
1.インストール準備
/etc/apt/sources.listに下記を追加
deb http://ftp.debian.org/debian stretch-backports main
2.sources.listの内容で更新する
apt-get update
3.python-certbot-apacheをインストール
apt-get install python-certbot-apache -t stretch-backports
4.Let’s EncryptのSSL証明書の設定
certbot –apache
↓
Client with the currently selected authenticator does not support any combination of challenges that will satisfy the CA.
エラーが出ているので、ネットで調べる
↓
↓
以下のコマンドで対応可能らしいのでやってみる。
certbot –authenticator standalone –installer apache -d brokendish.org –pre-hook “apachectl stop” –post-hook “apachectl start”
↓
root:/etc/apt# certbot –authenticator standalone –installer apache -d brokendish.org –pre-hook “apachectl stop” –post-hook “apachectl start”
:
:
Created an SSL vhost at /etc/apache2/sites-available/020-wordPress-le-ssl.conf
Deploying Certificate for brokendish.org to VirtualHost /etc/apache2/sites-available/020-wordPress-le-ssl.conf
Enabling available site: /etc/apache2/sites-available/020-wordPress-le-ssl.conf
Please choose whether or not to redirect HTTP traffic to HTTPS, removing HTTP access.
——————————————————————————-
1: No redirect – Make no further changes to the webserver configuration.
2: Redirect – Make all requests redirect to secure HTTPS access. Choose this for
new sites, or if you’re confident your site works on HTTPS. You can undo this
change by editing your web server’s configuration.
——————————————————————————-
Select the appropriate number [1-2] then [enter] (press ‘c’ to cancel): 2
Redirecting vhost in /etc/apache2/sites-enabled/020-wordPress.conf to ssl vhost in /etc/apache2/sites-available/020-wordPress-le-ssl.conf
——————————————————————————-
Congratulations! You have successfully enabled https://brokendish.org
You should test your configuration at:
https://www.ssllabs.com/ssltest/analyze.html?d=brokendish.org
——————————————————————————-
IMPORTANT NOTES:
– Congratulations! Your certificate and chain have been saved at:
/etc/letsencrypt/live/brokendish.org/fullchain.pem
Your key file has been saved at:
/etc/letsencrypt/live/brokendish.org/privkey.pem
Your cert will expire on 2018-05-11. To obtain a new or tweaked
version of this certificate in the future, simply run certbot again
with the “certonly” option. To non-interactively renew *all* of
your certificates, run “certbot renew”
– If you like Certbot, please consider supporting our work by:
Donating to ISRG / Let’s Encrypt: https://letsencrypt.org/donate
Donating to EFF: https://eff.org/donate-le
root:/etc/apt#
出来たようです。設定はこれで完了。
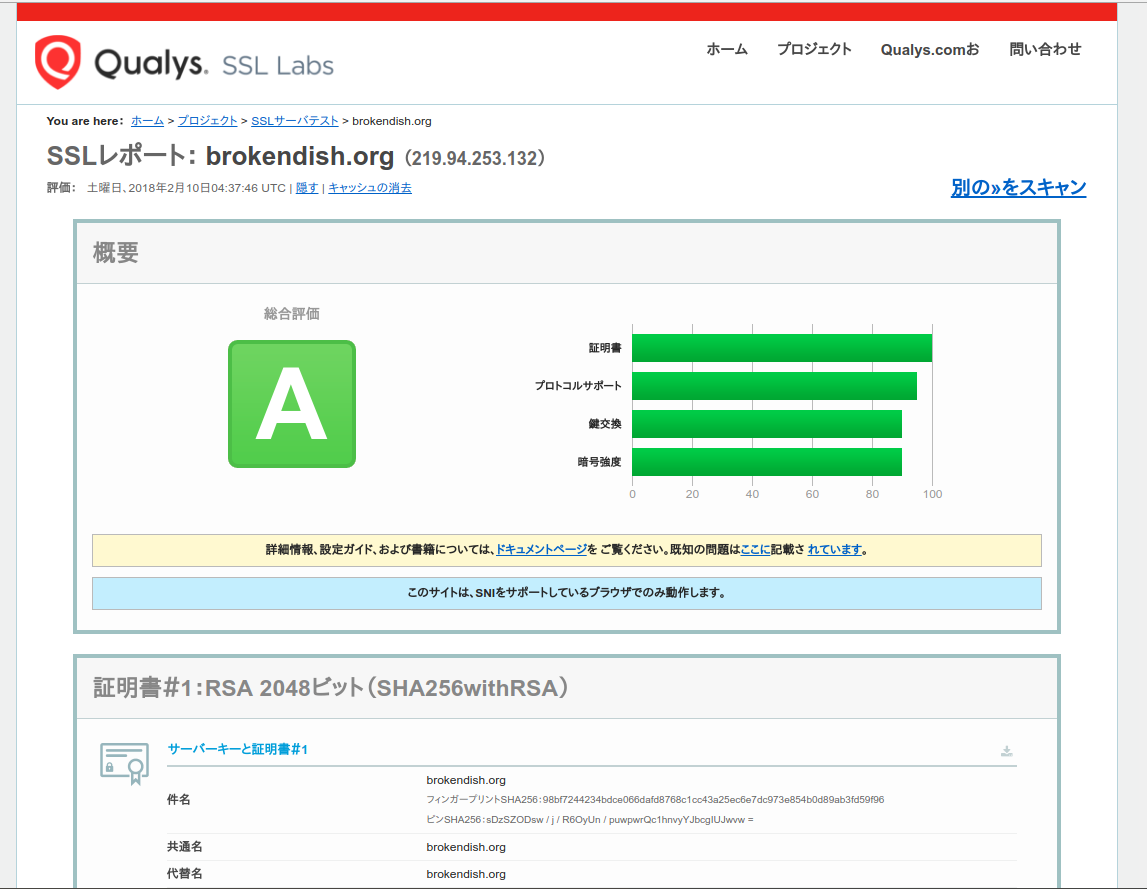
5.確認してみる
上記ログにあるように下記で確認してみる。
https://www.ssllabs.com/ssltest/analyze.html?d=brokendish.org
で確認してみます。
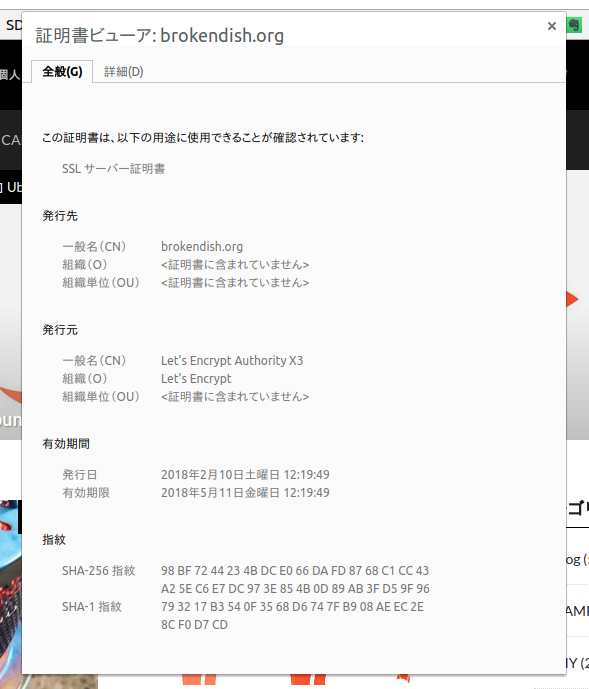
証明書を確認してみる
6.証明書の自動更新
証明書の有効期限は90日間なので、更新するコマンドを定期的に実行する。
手でやるのは面倒くさいのでcronに登録します。
毎月1日の5時55分に更新するように設定しておきます。
55 05 1 * * /usr/bin/certbot renew >> /var/log/LetsEncrypt_renew.log